



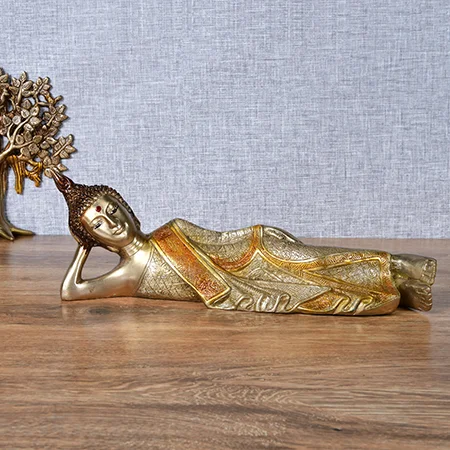
Brass, polished metal, and glazed pottery all share the same core photography challenge — they reflect their surroundings like a mirror, including your lights, your studio, and the camera itself. The fix isn't eliminating reflection (that flattens the piece and kills its shine), but controlling where it appears using diffused, off-axis lighting, light tents for smaller pieces, and tools like polarizing filters and black cards to shape contrast and contour. Dark or unglazed pieces face the opposite problem — cameras tend to render them as a flat, muddy gray — which needs a different fix: exposure adjustment and raking side light to reveal texture.
If you sell brass, metal, or pottery handicrafts, here's exactly how to handle glare and reflection so your photos show the craftsmanship instead of hiding it.
Why Reflective Handicrafts Are So Hard to Photograph
Polished brass, silver, and glazed pottery all behave the same way under a camera: instead of showing their own surface, they show whatever is around them — your studio lights, the ceiling, the camera, even you standing behind it. This is fundamentally different from photographing a matte or fabric product, where light simply illuminates the surface. With a reflective surface, you're not lighting the object directly — you're designing what gets reflected in it.
This is why standard, straightforward lighting setups that work well for most products often fail badly on brass or glazed ceramics, producing harsh hotspots, visible camera reflections, or a confusing mess of unwanted reflected shapes across the surface.
The Core Principle: Light Bounces Off Reflective Surfaces at the Same Angle It Arrives
Every technique in this guide comes back to one physical principle: light reflects off a shiny surface at the same angle it hits it. If your light and your camera are positioned along the same line, the glare bounces straight back into your lens — that's the harsh hotspot ruining your shot. Move the light off to the side or above, and that same hotspot bounces away from the camera instead, out of frame.
This single idea explains almost every glare problem and its fix: when a bright spot is ruining a shot, the solution is almost always to move the light (or your shooting angle), not to try to fix it in editing afterward.
Lighting Techniques for Brass and Polished Metal
Brass and other polished metals don't let light pass through — they reflect their environment entirely, which means every visible surface around the piece matters, not just the light source itself.
- Use two large, diffused light sources rather than one direct light — wide softboxes or diffusion panels spread the reflection into a soft, even sheen rather than a single blinding hotspot.
- Position lights off-axis from the camera, angled so their reflection bounces away from the lens rather than straight back into it.
- Use black cards for negative fill — this sounds counterintuitive, but placing a black card strategically between the light and the brass piece (out of frame) creates a dark, defining stripe on the metal's surface, which adds contour, contrast, and a more sophisticated, dimensional look rather than a flat, overly bright surface.
- Control the entire surrounding environment, not just the light — since the piece reflects whatever is nearby, a clean, controlled shooting tent or enclosure keeps unwanted studio clutter out of the reflection.
Lighting Techniques for Glazed Pottery
Handicraft Photography for Amazon
At Lohar Studio, we specialize in handicraft photography for Amazon, helping artisans and sellers showcase wooden, pottery, textil...
Explore Handicraft Photography for AmazonGlazed pottery shares brass's mirror-like tendency but adds a layer of complexity: glaze often has color and depth beneath its reflective surface, and the goal is to show both the glaze's shine and the pottery's actual color and texture underneath.
- Diffused, soft lighting from multiple angles helps show the glaze's genuine color without letting glare wash it out entirely.
- Shoot from multiple angles for the same piece, since a glazed surface can look noticeably different depending on the angle it's photographed from — a single fixed angle often fails to represent how the glaze actually looks and shifts in person.
- Avoid completely flat, frontal lighting, which tends to kill the glaze's natural shine and depth, making a richly glazed piece look artificially dull.
Also Read: Why Artisan Products Are Harder to Photograph Than Factory-Made Goods
Handling Dark or Oxidized Metal and Unglazed Pottery
Dark-glazed pottery, oxidized or antique-finish metal, and unglazed terracotta face the opposite problem from bright brass or glossy glaze: cameras tend to render dark objects as a flat, muddy gray, with fine surface detail collapsing into shadow.
- Adjust exposure deliberately — rather than trusting an automatic exposure reading, manually reduce exposure until the piece renders as genuinely dark, while keeping enough detail visible in the surface
- Use low, raking side light — light skimming across the surface at a low angle reveals texture, carving, and glaze variation that flat, head-on lighting flattens into invisibility
Using Diffusion: Light Tents and Softboxes
For small to medium handicrafts — figurines, brass idols, small pottery pieces — a light tent (a simple cube of translucent white fabric, lit from outside) is one of the most effective and accessible tools available. It wraps the piece in soft, even light from every direction, taming mirror-like reflections without eliminating shine. This is often the single most practical upgrade for a studio regularly shooting reflective handicrafts, since it solves the core "unwanted reflection" problem before any other technique is even needed.
Polarizing Filters: What They Can and Can't Fix
A circular polarizing filter on the camera lens is a genuinely useful tool for cutting glare — but it's important to know its limits for handicraft photography specifically:
- Highly effective on: glass, glossy ceramics, varnished or lacquered wood, and painted or coated surfaces — rotating the filter while checking the viewfinder can dramatically reduce unwanted reflections on these materials
- Does not work on: bare, uncoated metal — a polarizer won't meaningfully reduce reflections on raw brass or silver, since the physics of metallic reflection differs from reflections off glass or coated surfaces
Handicraft Photography for Flipkart
At Lohar Studio, we specialize in handicraft photography for Flipkart, helping artisans and sellers showcase wooden, pottery, text...
Explore Handicraft Photography for FlipkartThis distinction matters practically: if your handicraft catalog includes both glazed pottery and bare brass pieces, a polarizer will meaningfully help with one and do almost nothing for the other — lighting technique remains the primary tool for metal.
Black Cards and Negative Fill: Shaping Reflection Instead of Eliminating It
One of the most useful professional techniques for reflective handicrafts is using darkness deliberately, not just light. A black card or board, positioned between the light source and the piece (out of the camera's frame), creates a defined dark stripe reflected on the object's surface. Rather than being a mistake, this is a controlled technique used to:
- Define the edges and contours of a rounded metal or ceramic form
- Add contrast and a sense of depth that flat, all-bright lighting can't achieve
- Create a more considered, premium look rather than an overly bright, information-less reflection
Camera Settings That Help With Reflective Handicrafts
- Use a moderate aperture (roughly f/5.6 to f/11) to keep the full piece in sharp focus while managing depth of field
- Keep the camera on a tripod with manual exposure, since consistent settings across a batch of similar pieces (brass idols, ceramic bowls) keep your catalog visually uniform
- Adjust white balance carefully per material, since brass, silver, and different pottery glazes can each shift color differently under the same lighting setup
Common Mistakes When Photographing Metal and Ceramic Handicrafts
- Using a single direct light source, creating a harsh, distracting hotspot directly reflected into the camera
- Over-diffusing to the point where the piece loses its natural shine and looks flat and lifeless
- Applying the same lighting setup to both bright brass and dark oxidized metal, when each needs a fundamentally different approach (diffusion versus exposure and raking light)
- Not accounting for the camera and photographer's own reflection appearing in a highly polished piece
- Skipping a polarizing filter for glazed ceramics where it would meaningfully help, or expecting it to work on bare metal where it won't
Building a Repeatable Process for a Handicraft Catalog
For a catalog spanning multiple materials — brass idols, glazed ceramics, unglazed terracotta — it helps to treat each material as its own lighting setup rather than forcing one universal approach across everything:
- Group your catalog by material type (polished metal, glazed ceramic, dark/unglazed pieces) before shooting
- Establish a tested lighting setup per material group, rather than adjusting from scratch for every individual piece
- Keep camera settings and background consistent within each group, so the catalog looks cohesive even as lighting technique varies between material types
- Document what worked for each material category, so future additions to the catalog can reuse the same proven setup rather than re-solving the same reflection problem repeatedly
Handicraft Photography Services In Delhi
Lohar Studio provides professional handicraft product photography in Delhi for artisans, craft exporters, D2C sellers, and ecommer...
Explore Handicraft Photography Services In DelhiFAQs
1. Why is brass so hard to photograph without glare?
Because polished brass reflects its surroundings like a mirror, including lights, the studio, and the camera itself — the fix is controlling what's reflected, not just adding more light.
2. Does a polarizing filter work on metal handicrafts?
It works well on glass, glossy ceramics, and coated or painted surfaces, but it has little to no effect on bare, uncoated metal like brass or silver.
3. How do I stop my camera from appearing as a reflection in a shiny piece?
Using a light tent, or cutting a small hole in a large white card for the lens to shoot through, replaces the camera's dark reflection with a clean white field instead.
4. What's the best lighting setup for glazed pottery?
Soft, diffused lighting from multiple angles works best, since it shows the glaze's shine and true color without washing out detail — a single flat, frontal light often flattens the glaze's natural depth.
5. Why do dark or oxidized metal pieces look muddy in photos?
Cameras tend to render dark objects as a flat gray, losing detail in shadow — fixing this requires manually adjusting exposure and using low, raking side light to reveal texture.
Handicraft Photography for Etsy
.
Explore Handicraft Photography for Etsy6. What is a black card used for in reflective product photography?
Positioned between the light and the object, it creates a defined dark stripe on the surface that adds contour and contrast — a deliberate technique, not a mistake to avoid.
7. Is a light tent worth it for small handicraft pieces?
Yes — for small to medium reflective items, a light tent is one of the most effective and accessible tools for taming mirror-like glare while preserving natural shine.
8. Should I use the same lighting setup for brass and pottery?
No — brass and other bare metals need diffusion and off-axis lighting to control pure reflection, while glazed pottery often benefits from multiple-angle shooting to capture its color and shine accurately.
9. What camera settings work best for photographing metal and ceramic handicrafts?
A moderate aperture (f/5.6–f/11) for adequate depth of field, manual exposure on a tripod for consistency, and careful white balance adjustment per material type.
10. How can I keep a large handicraft catalog visually consistent despite different materials?
Group your catalog by material type, establish and document a tested lighting setup for each group, and keep camera settings and background consistent within each material category.
Photographing a brass, metal, or pottery handicraft collection?
[Contact Lohar Studio] about your specific materials and finishes — we'll plan the right lighting approach for each, whether it's polished brass, glazed ceramics, or dark oxidized pieces, so your catalog looks consistent and true to the craftsmanship.
If you're looking to enhance your brand’s presence on leading e-commerce platforms like Amazon, Flipkart, Myntra, Meesho, TataCliQ, Snapdeal, and Ajio, Lohar Studio is your go-to destination. Our team specializes in delivering high-quality images for fashion items, footwear, automotive products, medical photography, business headshots, and corporate shoots. We serve Delhi, Noida, Gurgaon, Faridabad, and Ghaziabad, offering professional results that boost conversions and elevate your brand’s image. Get in touch today at +91 9312070458 or visit us at A1/58, 1st Floor, Sector 6 Rd, Pocket 1, Sector 6A, Rohini, Delhi, 110085, to schedule your next shoot!
Written from hands-on experience shooting for 4000+ brands - practical, field-tested photography advice, not just theory.